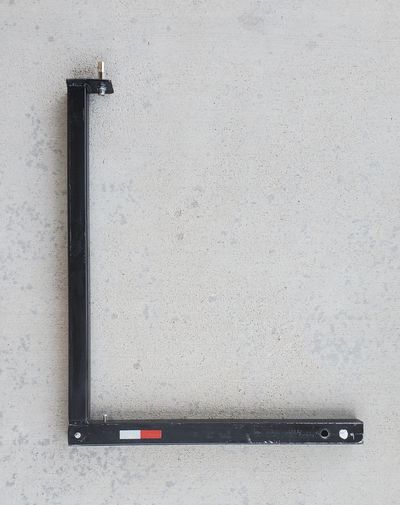
Hitch mount
On the POTA Facebook group,I often mention the I use a hitch mount for my antennas on most of my activations. It is a simple device I made about a year ago that has pretty much become my #1 tool for activations.
The lower arm is 2" square tubing, and the upper arm in 1-3/4" square tubing. The only reason for the two different sizes is because that just happened to be the two pieces I had in my scrap pile. The length of the lower arm, the one that goes into the receiver hitch, was made to be just long enough so I could open the tailgate when the hitch mount was in place. The upper arm is the height that it is, only because that's how long that particular piece of tubing was straight out of the scrap pile. :)
The tab welded to the top of the upper arm is a piece of 1/4" tick flat bar. Installed in that is an SO-239 to 3/8"-24 bulkhead fitting. This is the common adapter used on CB antenna mirror mounts, and they are readily available from Amazon and just about any place that sells ham or CB radios.
I purposely mounted the upper tab facing inwards, because 1) I'm a bit clumsy sometimes, and I could just picture myself getting my shirtsleeve caught on it as I walked past it and causing some hilarious 'tear a shirtsleeve off as I fall to the ground' disaster, and 2) I new at some point I would want to lash one of my mast poles to it.

some close-ups

Close up of the SO-239 to 3/8"-24 threaded stud mount. The top piece with the two nubs is a quick disconnect adapter. I use this style adapter on all of my vertical antenna parts including the coil, various whips, extensions, and tripods. Makes the on/off process very fast and easy, especially if there's a bit of a breeze.

The 1/4"-20 bolt threaded in at the top is just where I store the grounding bolt so I won't loose it. I use it to snug the mount to the receiver hit

To the left of the hitch pin hole is where I ground off the paint to give the above mentioned grounding bolt a place to seat itself to bare metal. It also has the added benefit of keeping the hitch mount snug inside the receiver when I leave it in place while driving.

The hole I drilled and tapped a hole into the receiver for the grounding bolt. I have not done the extensive bonding that seems to be recommended to a lot of people, and quite frankly, I don't think it is all that necessary. At least, not in my case. While everyone for some reason want's to see that "perfect 1.1:1 SWR", that's not a great goal to shoot for at all!!! A 1.1:1 SWR on a vertical

This is the most common configuration in which I use the hitch mount. I run a 3' extension under the coil to center load it, then I will run either a 78" or 102" whip on the coil. I'll use the 102" whip when I want to use 60m. Shown here is my larger BNC V.1 coil which, along with the 102" whip and added radials, will tune down to the FT8 frequency of 80m.
This configuration is extremely useful

The hitch mount also works perfectly to erect one of my mast poles. I picked up the 2" u-bolts from my local Ace Hardware. Since they only need to be snugged up and not super tight, I added wing nuts to the u-bolts so they can be hand tightened. The small piece of wood sticking out of the hitch mount, and below the mast, is to keep the mast from sliding down. During this activation I was using
Copyright © 2024 W0BNC Amateur Radio - All Rights Reserved.
Powered by GoDaddy